Cloudera Installation and Configure Multi Node Cluster
- Open Putty:


2. Type Your Machine IP address and then click on Open


3.Then Login as per Username & Password:


4. Type: vi/etc/hosts then add remaining hosts


5. Edit: vi/etc/sysconfig/network


6. Type: vi/etc/selinux/config


SELINUX =enforcing replaced with disabled
7.Type: setenforce 0
8.Type: yum install ntp ntpdate ntp-doc: Install ntp(Netowork Time Protocol)
9. After Installation ntp then check ntp configurations type: chkconfig ntpd on
10.Type: vi/etc/ntp.conf
11.Type : ntpq -p
12.Then start the service ntpd start
13.Then ntpq


14. Then rsa pub key generator ssh-keygen-t rsa in remaining machines


15. File save as id_rsa
16.cd /root/.ssh
17.ll -check whether id_rsa.pub is there or not
18.cat id_rsa.pub>authorized_keys
19.Type: scp authorized_keys root@machine@.localdomain:/root/.ssh


20.Then type : yum install openssl python perl
21. yum clean all
22.yum repolist
23. Then download Clouder Manager using below command
wget http://archive.cloudera.com/cm5/installer/latest/cloudera-manager-installer.bin


24.chmod 700 cloudera-manager-installer.bin

25.Then type ./cloudera-manager-insatller.bin click on Next


26. After that Accept License


27. It will take automatically installing JDK


28. Automatically Installing Embedded Database


29. Cloudera manager server Installing


30. Installation Successfully


31.Click on “OK”


32. If you get any Error then you have disabled Firewalls and IP tables
33. Disabled firewall Type: systemctl disable firewalld
34. Disabled IPV6 Type: vi /etc/sysctl.conf


35. Browse your Machine IP:xxx.xxx.xx.xxx:7180


36.Login : Username: admin
Password: admin


37. Yes, I accept the UserLicense ” Terms and Conditions”


38. Select Cloudera Express “Free”


39.Then Search host machines using as per domain names


40. Select Repository


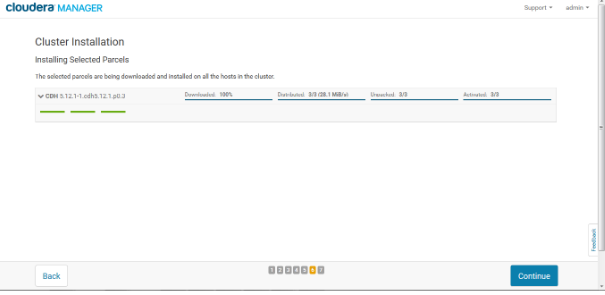
41. If you need any Proxy Settings then select and fill it. Don’t need leave it.


42.Click on Continue for Three machines cluster Installations. Is there any issue then choose Mozila FireFox .


43. Click on “Continue” check CDH version


44. 100% completed then click on “Continue”

45.After “Continue” then check Validations
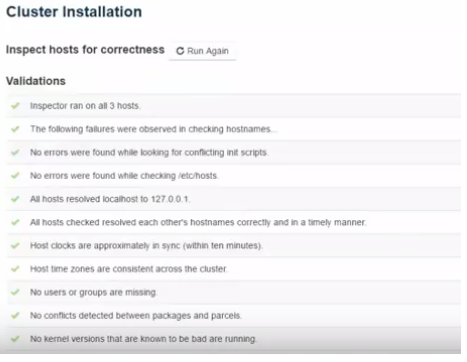

46. Here mainly two validations are showing warnings then type below commands then Run Again


echo never > /sys/kernel/mm/transparent_hugepage/enabled
echo never > /sys/kernel/mm/transparent_hugepage/defrag
sysctl vm.swappiness=10
47. Click on “Finish”


48.It shown Version Summary


49.HDFS NameNode and ResourceManager must be different


50.Select “Core with Spark” then Continue


51. Click on “Test Connection” when using embedded Database


52.Successful Setup the Cluster.

