In this article, we will explain what is the Airflow and Architecture. How to install Airflow in Linux machines.
Airflow:
Airflow is an open-source tool for dynamically authoring, scheduling, and monitoring data pipelines. Data pipelines in the sense Batch data pipelines. CI/CD and Dynamically pipelines.
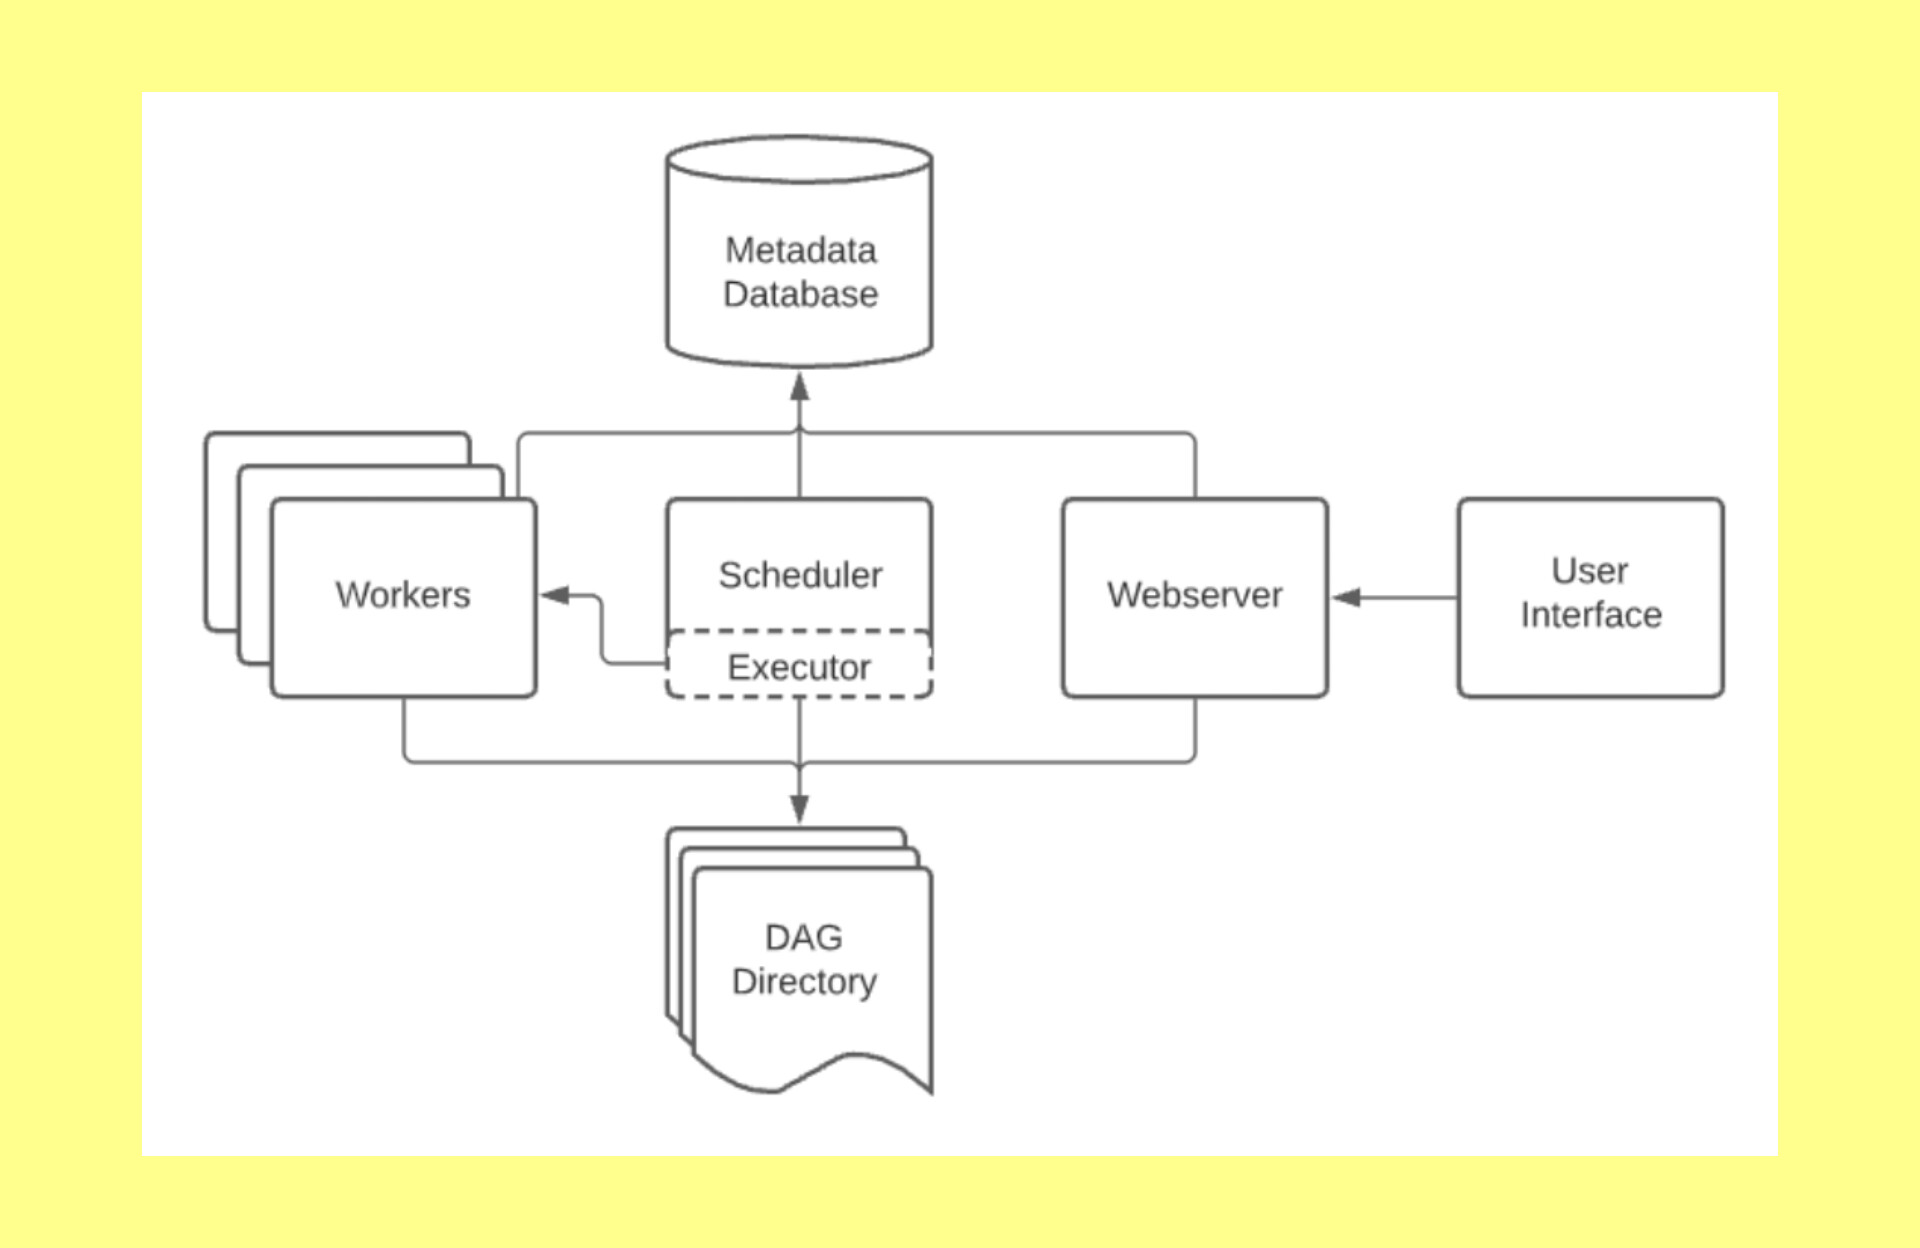
User Interface:
Either client or user
Webserver :
We can use Apache Tomcat/Ngnix server as a Webserver for Web-UI purpose.
Scheduler:
Basically, here Scheduler as a Daemon and responsible for scheduling jobs. What/where/when/where we need to be run.
Executor:
It is same like Spark executor, how it works. Same functionality happens in the Airflow as well. In simply it means that Azure CLI.
Workers:
Here Workers means just executes the tasks. It purely depends on the which executor in the Airflow environment.
Metadata Databse:
In Airflow Architecture Databases in the sense like external Databases MySQL, SQL etc. But by default database is SQLite.
Most of the cases we are using MySQL, SQL, PgSQL etc in the Airflow infrastructure.
DAG Directory:
It is same like HDFS directory but large data files will not store it. Just stores the simple script files in the DAG directory.
How to Install the Airflow on Linux machines
Here we provided simple steps to install the Airflow infrastructure.
Step 1: Login with root user using the below command
sreekanth@sreekanth:~$ sudo -i [enter password]
Step 2 : Install the Python pip
root@sreekanth:~$ apt install python3-pip
Step 3: Then install Python pip virtual environment command in the CLI
root@sreekanth:~$ pip3 install virtualenv
Step 4: Create a make directory for airflow workspace using the below command
root@sreekanth:~$ mkdir -p airflow_workspace
Step 5: Change directory to airflow workspace
root@sreekanth:~$ cd airflow_workspace
Step 6: Then create airflow directory
root@sreekanth:~$ mkdir -p airflow
Step 7: Here we are creating airflow environment
root@sreekanth:~$ mkdir -p airflow_env
Step 8: With in the workspace create a virtualenv
root@sreekanth:~/airflow_workspace$ virtualenv airflow_env
Step 9 : To activate the airflow source
root@sreekanth:~/airflow_workspace$ source airflow_env/bin/activate
Step 10 : To install the Apache airflow using the below command
airflow_env) root@sreekanth:~/airflow_workspace$ pip3 install apache-airflow
Step 11: After that change the directory for airflow
(airflow_env) root@sreekanth:~/airflow_workspace$ cd airflow
Step 12: Initialize the Airflow DB using below command
(airflow_env) root@sreekanth:~/airflow_workspace/airflow$ airflow db init
Step 13: Create the DAGs
(airflow_env) root@sreekanth:~/airflow_workspace/airflow$ mkdir dags
Step 14 : Started the airflow scheduler
(airflow_env) root@sreekanth:~/airflow_workspace/airflow$ airflow scheduler
Step 15: Started the airflow webserver
(airflow_env) root@sreekanth:~/airflow_workspace/airflow$ airflow webserver
Next, accesss the localhost with 8080 port. We can able to login.
http://localhost:8080/
If anyone have any doubts, kindly comment it. We will solve it